
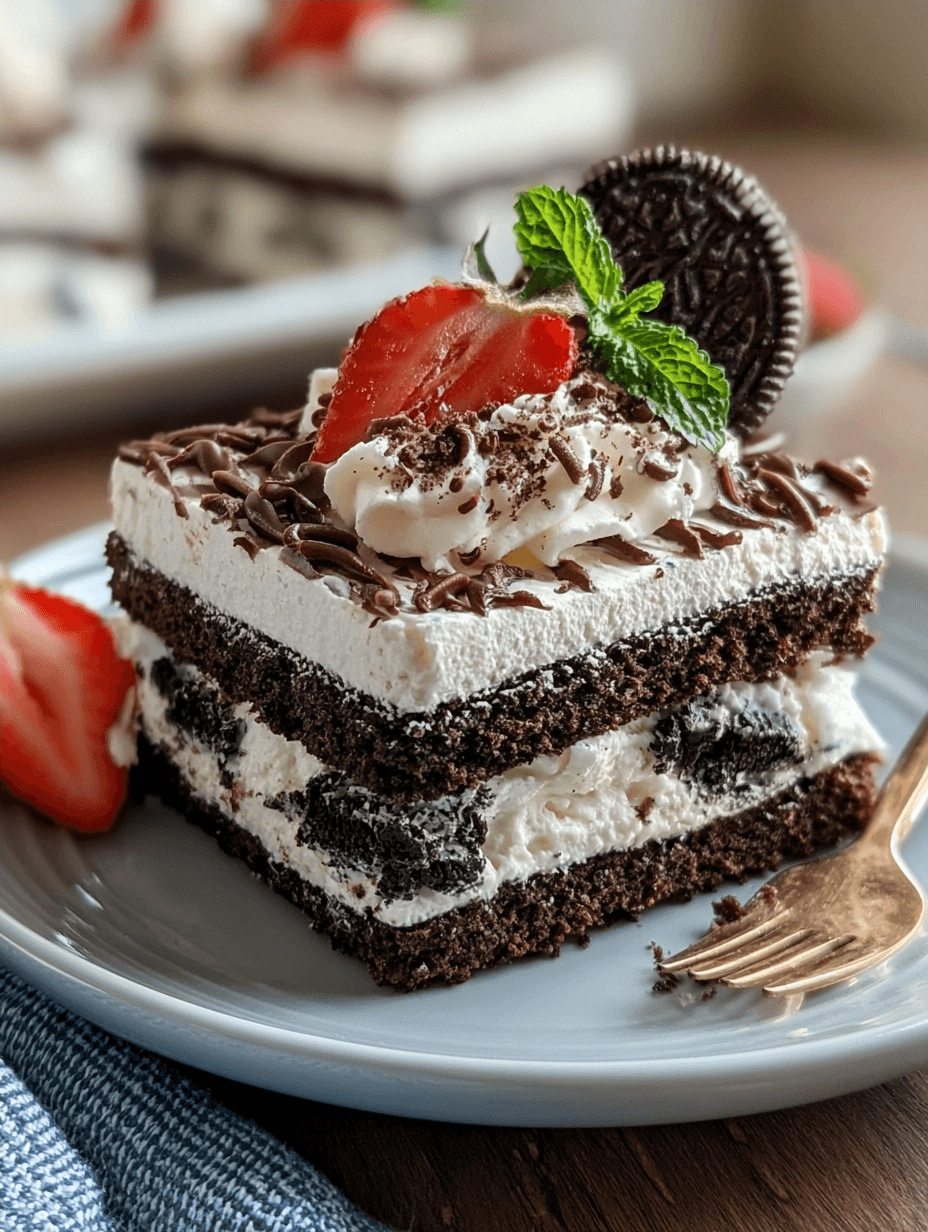
A Summer Oreo Ice Box Cake 3 ingredient easy version provides the perfect cooling treat for hot afternoons without turning on your oven. During my early days learning to cook, I often felt overwhelmed by complex desserts until I discovered the magic of no-bake recipes. This specific creation represents the philosophy I use at Eminent Recipes where simple, high-quality ingredients produce elegant results for your family. Its quick, easy, and family-friendly nature makes it a regular favorite for busy weeknights or special weekend gatherings.
Recipe Overview
| Category | Details |
|---|---|
| Prep Time | 15 Minutes |
| Cook Time | 0 Minutes |
| Total Time | 6 Hours (includes chilling) |
| Servings | 12 |
| Difficulty | Beginner |
| Cuisine | American Dessert |
Why This Recipe Works
This recipe works because the natural moisture of the whipped cream transforms the crunchy cookies into a texture reminiscent of soft cake over time. By allowing the dessert to sit, the cookies absorb the sweet cream and soften completely.
You will appreciate the flexibility of this dessert for different occasions, whether it is a birthday party or a quick post-dinner treat. I personally find that using high-quality heavy cream creates a much more stable structure than many store-bought alternatives, ensuring the cake holds its shape perfectly when sliced.
Ingredients
| Ingredient | Quantity | Notes |
|---|---|---|
| Oreo Cookies | 36-40 | Regular or thin style |
| Heavy Cream | 2 Cups | Must be cold |
| Powdered Sugar | 0.5 Cup | Adjusted for sweetness |
| Vanilla Extract | 1 Teaspoon | Pure vanilla preferred |
Step-by-Step Instructions
Preparing the Cream Filling
- Pour the cold heavy whipping cream into a large chilled mixing bowl.
- Add the powdered sugar and vanilla extract to the cream.
- Beat the mixture using an electric hand mixer on high speed until stiff peaks form.
Assembling the Layers
- Spread a thin layer of the whipped filling across the bottom of a 9×9 inch baking dish.
- Arrange a single layer of Oreo cookies side-by-side on top of the cream.
- Cover the cookie layer with a generous spread of the whipped topping.
- Repeat these layering steps until you reach the top of the dish, finishing with a final layer of cream.
Chilling and Serving
- Cover the baking dish tightly with plastic wrap to prevent the dessert from absorbing odors in the fridge.
- Refrigerate the cake for at least 4 to 6 hours or overnight for the best texture.
- Decorate the top with crushed cookies and chocolate drizzle immediately before serving.
Chef Tips for Perfect Results
- Always use a chilled bowl and beaters to ensure your cream whips up into a very stable, fluffy consistency.
- Ensure you spread the cream all the way to the edges of the dish to keep the cookies moist throughout.
- Wait for the full chilling duration before slicing because this allows the cookies to reach the correct cake-like texture.
- Use a hot knife wiped clean after every slice to get perfectly shaped squares every single time.
Common Mistakes to Avoid
One common mistake is whipping the cream too fast, which leads to butter instead of a light frosting. Stop as soon as you see firm peaks that hold their shape. Another error is not letting the cake chill long enough, which results in cookies that are still crunchy; patience is key to success. Ensure you use an airtight cover, as cream-based desserts can dry out or pick up unwanted flavors in a busy refrigerator.
Variations and Substitutions
| Ingredient | Substitution | Impact |
|---|---|---|
| Heavy Cream | Cool Whip | Shorter prep time |
| Oreos | Golden Oreos | Lighter, milder flavor |
| Vanilla Extract | Almond Extract | Adds nutty undertones |
Frequently Asked Questions
Can I make this dessert nut-free?
Yes, you can easily make this nut-free by ensuring your chosen cookie brand is certified safe for your requirements. Standard Oreo cookies are widely used for this, but always check labels if you have severe allergies.
How do I know when the cake is ready to eat?
The cake is ready when you can easily insert a knife through the layers without resistance from hard cookies. A total chill time of at least six hours is usually required for this to occur.
Can I freeze the ice box cake?
You can freeze the cake for up to two weeks if you wrap it securely in multiple layers of plastic. Allow it to thaw in the refrigerator for two hours before you plan to serve it.
Why did my whipped cream collapse?
Your cream likely collapsed because it was not whipped long enough or the temperature of the ingredients was too warm. Start with very cold ingredients to ensure a stable, whipped structure.
What is the minimum chilling time?
The absolute minimum chilling time is four hours for basic softening, though overnight is heavily recommended. Longer chilling provides a more uniform texture throughout the entire dessert.
Conclusion
Mastering this simple dessert shows that you do not need an oven to impress your guests with professional-style sweets. By focusing on quality ingredients and proper chilling, you create a treat that rivals any bakery option. The beauty of this recipe lies in its consistency and the joy it brings to every table. I hope this becomes a staple in your home as it is in mine, offering a cool, creamy finish to any meal throughout the summer months.
Print
Summer Oreo Ice Box Cake
- Total Time: 360
- Yield: 12 servings 1x
- Diet: Vegetarian
Description
Indulge in a perfect cooling treat with this 3-ingredient Summer Oreo Ice Box Cake. This no-bake dessert requires no oven, making it ideal for hot afternoons. By layering crispy Oreo cookies with a freshly whipped cream mixture, the cookies soften into a tender, cake-like texture as they chill. Simple, elegant, and family-friendly, this delightful recipe is a crowd-pleaser for birthdays or busy weeknights, consistently delivering a sophisticated dessert with minimal effort.
Ingredients
36–40 Oreo cookies (regular or thin)
2 cups heavy whipping cream, cold
0.5 cup powdered sugar
1 teaspoon pure vanilla extract
Instructions
Place cold heavy whipping cream, powdered sugar, and vanilla extract into a large chilled mixing bowl.
Beat the mixture on high speed using an electric hand mixer until stiff peaks form.
Spread a thin layer of the whipped filling across the bottom of a 9×9 inch baking dish.
Arrange a single layer of Oreo cookies side-by-side over the cream.
Cover the cookies with a generous spread of the whipped topping.
Repeat the layering process until the dish is filled, finishing with a final layer of cream.
Cover tightly with plastic wrap and refrigerate for 4 to 6 hours or overnight for the best texture.
Notes
Using high-quality heavy cream creates a more stable structure. Ensure the cream is very cold before whipping to achieve the correct consistency. For additional flair, top with crushed Oreos before serving.
- Prep Time: 15
- Category: Baking
- Method: No-bake
- Cuisine: American
Nutrition
- Serving Size: 1 slice
- Calories: 320
- Sugar: 22g
- Sodium: 180mg
- Fat: 20g
- Saturated Fat: 12g
- Carbohydrates: 35g
- Fiber: 1g
- Protein: 3g
- Cholesterol: 65mg