
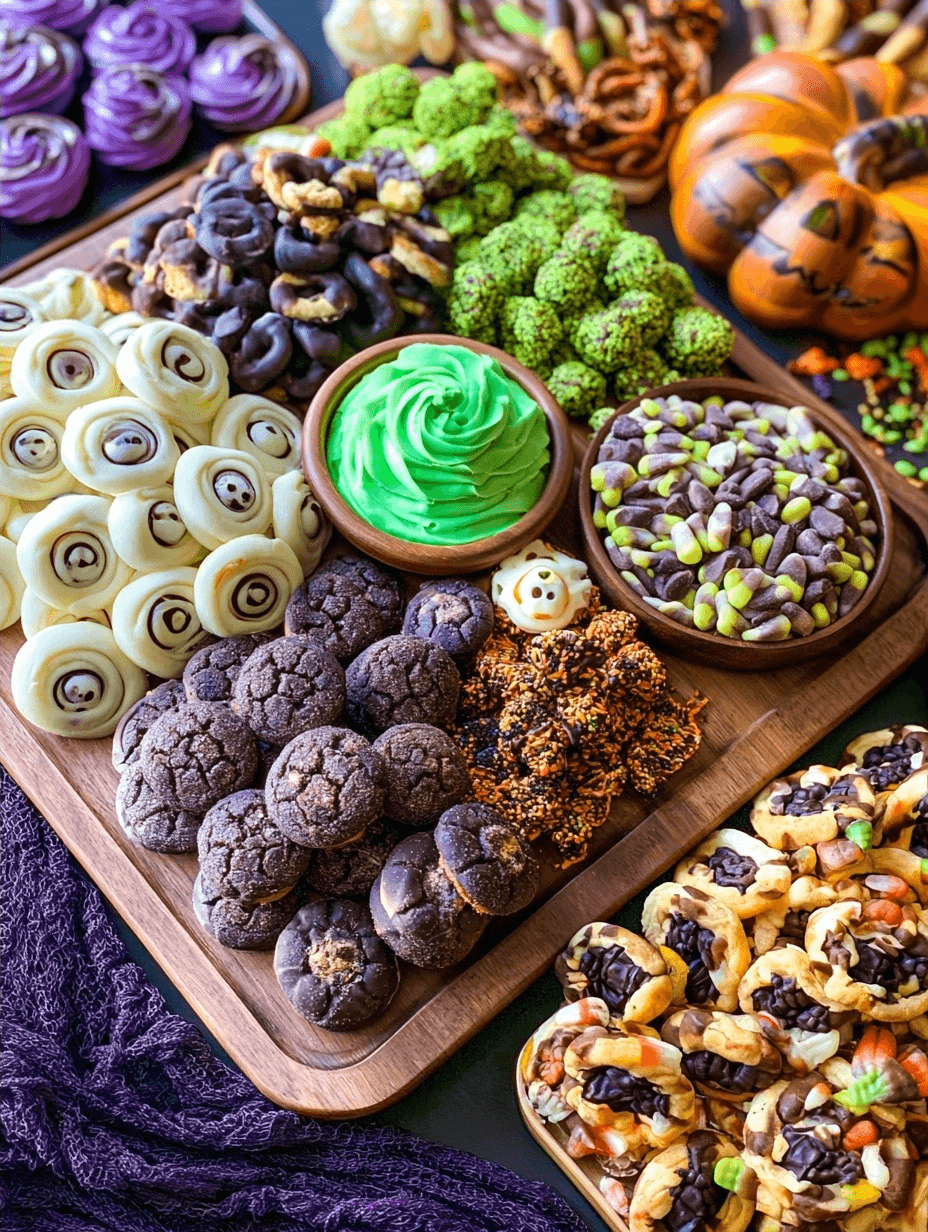
A Halloween party dessert board acts as the ultimate centerpiece for your spooky celebration by bringing together a variety of seasonal treats in one stunning display. At Eminent Recipes, I focus on creating comfortable, customizable food displays that save time while impressing guests. You will love this board because it is quick to assemble, incredibly easy to customize, and perfectly suited for busy weeknights or large festive gatherings.
Recipe Overview
| Prep Time | 20 minutes |
| Cook Time | 0 minutes |
| Total Time | 20 minutes |
| Servings | 12-15 |
| Difficulty | Easy |
| Cuisine | Fusion |
Why This Recipe Works
This dessert board works because it provides a balanced selection of textures and flavors that cater to every guest at your party. By combining soft marshmallows, crisp brownie bark, and creamy chocolate, you create a dynamic experience that keeps visitors coming back for another bite.
Developing this concept at Eminent Recipes taught me that visual organization makes all the difference in food presentation. When you apply basic principles of contrast and structure, you transform simple supermarket snacks into a professional-grade display that anchors your event decor perfectly.
Ingredients
| Ingredient | Quantity | Notes |
|---|---|---|
| Cat sugar cookies | 1 package | Look for seasonal holiday shapes |
| Chocolate frosted donuts | 6-8 pieces | Substitute with plain glazed if desired |
| Brownie bark | 1 bag | Break into large shards |
| Black and purple lollipops | 5-10 pieces | Adds height and interest |
| Green lofthouse cookies | 1 package | Provides soft texture |
| Mint Oreos | 1 package | Offers a cooling contrast |
| Chocolate pretzels | 2 cups | Adds a salty element |
| Green apple marshmallows | 1 cup | Great for color pops |
| Caramel apple popcorn | 2 cups | Use as a structural base |
| Green licorice | 1 package | Twist for visual movement |
| Gummy frogs | 1 bag | Adds a playful touch |
| Chocolate squares | 1 pack | Use high-quality dark chocolate |
| Black rock candy | 2 sticks | Visual intrigue |
| Purple sixlets | 1 cup | Fill in small gaps |
| Purple M&Ms | 1 cup | Adds color consistency |
| Green jelly beans | 1 cup | Perfect for filling |
| Purple candy corn | 1 cup | Thematic holiday staple |
| Junior Mints | 1 box | Great snackable size |
| Black grapes | 2 cups | Fresh fruit addition |
Step-by-Step Instructions
Setting the Foundation
- Add 2-3 bowls filled with loose items like caramel apple popcorn and purple sixlets, purple candy corn, and brownie bark to the board to create structure and anchor the rest of your snacks.
- Add your large items like cat sugar cookies, chocolate frosted donuts, green lofthouse cookies, and mint Oreos in opposite corners or areas of the board.
Theming and Details
- Add themed items in varying locations on the board like the black and purple swirl lollipops, gummy frogs, and black rock candy.
- Break up big blocks of the same color with other colors like green apple marshmallows and purple M&Ms to create visual interest.
Finishing Touches
- Place square and rectangle items such as chocolate covered pretzels, chocolate squares, and green licorice in a curved fashion to improve fit.
- Fill in all remaining gaps with green jelly beans, Junior Mints, and black grapes to ensure the entire board is covered for a cohesive look.
- Serve with plates and utensils on the side so guests can easily grab their desired treats.
Chef Tips for Perfect Results
- Always prioritize color contrast when grouping items to ensure specific textures do not blur together.
- Utilize varying heights by vertically placing lollipops or stacking cookies to add dimension to your board.
- Keep fresh fruit like grapes near the edge of the board to prevent them from rolling into other loose candies.
- Avoid overcrowding one section by spreading out your heavier items like donuts evenly across the board surface.
- Place small snacks in dedicated bowls to prevent them from migrating into neighboring candy piles during busy party hours.
Common Mistakes to Avoid
- Spacing items too far apart creates visible empty board space which makes the layout look unfinished and less festive.
- Neglecting texture balance leads to a board that is either too crunchy or too soft, so aim for variety.
- Ignoring color groupings can result in a messy aesthetic instead of a professional-looking art piece.
- Forgetting to provide serving utensils forces guests to use their fingers, which can be unhygienic at large gatherings.
Variations and Substitutions
| Ingredient | Substitution | Impact |
|---|---|---|
| Mint Oreos | Dark chocolate cookies | Removes the minty flavor profile |
| Gummy frogs | Gummy worms | More traditional Halloween theme |
| Caramel popcorn | Salted kettle corn | Lower sugar intensity |
Frequently Asked Questions
Can I make this dessert board ahead of time?
Yes, you can assemble the board up to two hours before your guests arrive, provided you keep it in a cool, dry place. Avoid adding fresh fruit until the last minute to ensure everything stays crisp and vibrant.
How do I prevent chocolate items from melting?
Maintain your board at room temperature away from direct sunlight or kitchen heat sources to keep chocolates firm. If your home is particularly warm, assemble the board in sections and add chocolate-heavy items just before serving.
Can I use different candy colors for my theme?
Absolutely, you can select any color palette that matches your specific party decor while keeping the structural layout the same. Simply substitute the purple and green items with your preferred color theme while maintaining the same snack variety.
How do I choose the best board size?
Select a board size based on your guest count, generally allowing for one square foot of surface area for every five people. Larger boards look more impressive, but smaller, full boards often feel more bountiful and inviting for intimate gatherings.
What is the best way to handle leftovers?
Store any remaining unwrapped candies in airtight containers to keep them fresh for up to one week after the event. Fresh fruit should be removed and stored separately in the refrigerator if you intend to keep them for personal consumption.
Conclusion
Building a Halloween party dessert board allows you to showcase your creativity while providing a crowd-pleasing selection of sweets for your guests. With the right mix of cookies, candies, and fruit, you create a festive focal point that anchors your entire party aesthetic. Remember to layer your colors and textures to ensure a balanced, professional, and visually stunning display. Start assembling your own masterpiece today to experience the simple, delicious, and fun side of holiday entertaining. Your efforts will surely result in a memorable snack scene that everyone will enjoy throughout the night.
Print
Halloween Party Dessert Board
- Total Time: 20
- Yield: 12-15 servings 1x
- Diet: Vegetarian
Description
Create a stunning and festive centerpiece for your Halloween celebration with this easy-to-assemble dessert board. This curated display brings together a delicious variety of seasonal sweets, including cat-shaped sugar cookies, brownie bark, and creamy chocolate. It is perfect for busy weeknights or large gatherings, offering a balanced mix of textures and spooky colors that guests will love. This board is designed to be visually organized, using contrast and structure to turn simple snacks into a professional-grade festive display that defines your party decor.
Ingredients
1 package cat sugar cookies
6–8 chocolate frosted donuts
1 bag brownie bark
5–10 black and purple lollipops
1 package green lofthouse cookies
1 package Mint Oreos
2 cups chocolate pretzels
1 cup green apple marshmallows
2 cups caramel apple popcorn
1 package green licorice
1 bag gummy frogs
1 pack dark chocolate squares
2 sticks black rock candy
1 cup purple sixlets
1 cup purple M&Ms
1 cup green jelly beans
1 cup purple candy corn
1 box Junior Mints
Instructions
Place the larger treats like the donuts and brownie bark shards on the board first to create a structural base.
Arrange the cookies and marshmallows in clusters around the larger items to add height and texture.
Fill the empty spaces between the larger items with the popcorn and pretzels to create a full look.
Intersperse the lollipops and rock candy sticks to create visual interest and focal points.
Scatter the smaller candies like jelly beans, Sixlets, M&Ms, and candy corn in the remaining gaps to ensure the board looks abundant.
Place the individual sweets like gummy frogs and chocolate squares as finishing touches.
Notes
Ensure you use a large wooden board or a flat platter. Use small bowls if you want to contain loose candies like M&Ms or jelly beans. Store any leftovers in airtight containers at room temperature for up to 3 days.
- Prep Time: 20
- Category: Baking
- Method: Assembly
- Cuisine: Fusion
Nutrition
- Serving Size: 1 serving
- Calories: 350
- Sugar: 32g
- Sodium: 180mg
- Fat: 14g
- Saturated Fat: 7g
- Carbohydrates: 52g
- Fiber: 2g
- Protein: 3g
- Cholesterol: 15mg