
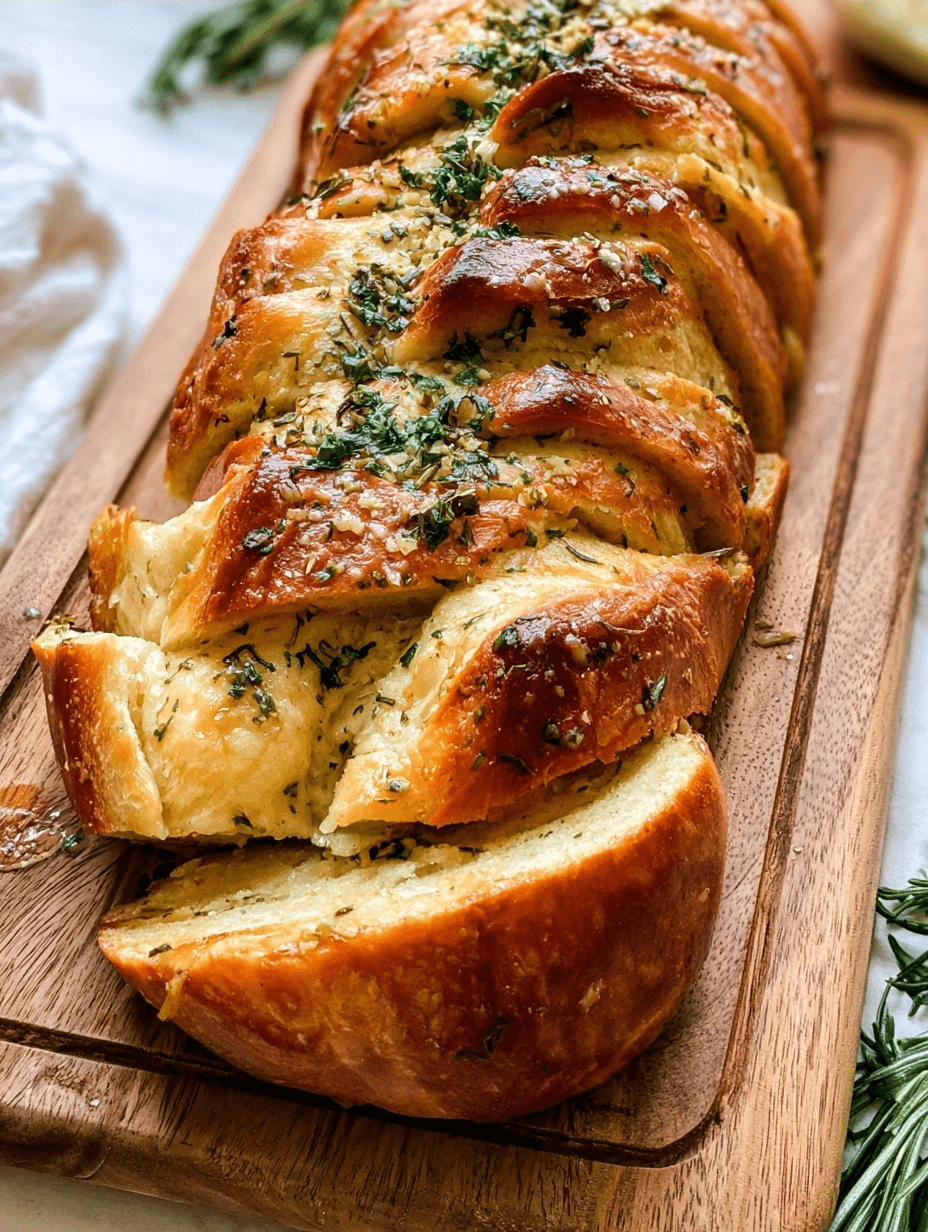
Pull apart garlic bread is a savory, tear-and-share yeast bread filled with aromatic herbs, buttery garlic, and melted cheese. This homemade dough relies on simple pantry staples to create a soft, golden loaf that elevates any dinner table. As a baker at Eminent Recipes, I prioritize dishes that balance comforting textures with bold, savory profiles. This recipe remains a household favorite because it is quick, easy, and incredibly versatile for busy weeknights.
Why This Recipe Works
This recipe works because it combines a reliable, soft yeast dough with a punchy garlic-herb butter that infuses every single layer. By dividing the dough into small, circular pockets, you ensure that every pull-apart piece is coated in savory goodness and melted cheese, rather than just the crust. I have refined this method to minimize effort while maximizing flavor, making it a reliable staple for both novice bakers and seasoned pros.
You will love how this dish serves as a bridge between a simple side and a standalone comfort meal. It provides the satisfaction of a warm, fresh bakery item without the complexity of sourdough or long-fermentation processes. Whether I am hosting a dinner party or simply craving something warm on a Tuesday, this bread consistently delivers a bakery-quality experience in my own kitchen.
Recipe Overview
| Prep Time | 20 minutes |
| Cook Time | 50 minutes |
| Total Time | 2 hours 30 minutes |
| Servings | 12 pieces |
| Difficulty | Intermediate |
| Cuisine | Italian-American |
Ingredients
| Ingredient | Quantity | Notes |
| Platinum Yeast | 2 teaspoons | Ensure it is not expired |
| Granulated Sugar | 1 Tablespoon | Feeds the yeast |
| Whole Milk | 3/4 cup (180ml) | Warm to 110F |
| Unsalted Butter | 8 Tablespoons | Divided for dough and filling |
| All-Purpose Flour | 2 1/3 cups | Spoon and level |
| Garlic Powder | 1.5 teaspoons | Divided |
| Fresh Herbs | 2 Tablespoons | Rosemary/Parsley mixture |
| Shredded Cheese | 3/4 cup | Mozzarella or Parmesan |
Step-by-Step Instructions
Making the Dough
- Combine the yeast, sugar, and warm milk in a mixing bowl and let sit for 10 minutes until frothy.
- Add the butter, egg, flour, salt, and garlic powder to the yeast mixture.
- Beat the dough on low speed until it pulls away from the sides, adding extra flour if the mixture remains too sticky.
- Knead the dough for five minutes until smooth and elastic, checking with the windowpane test to ensure gluten development.
- Place the dough in a greased bowl, cover with plastic wrap, and allow to rise in a warm spot for 60-90 minutes until doubled.
Assembling the Bread
- Prepare the filling by whisking together the softened butter, herbs, minced garlic, and salt until smooth.
- Punch down the risen dough and divide it into 12 equal, golf-ball-sized pieces.
- Flatten each piece into a four-inch circle and spread a portion of the garlic butter and cheese onto the surface.
- Fold each circle in half and arrange them round-side up in a greased 9×5 inch loaf pan.
- Cover and let the bread rise for another 45 minutes until noticeably puffy.
Baking
- Preheat your oven to 350F and position the rack in the lower third of the oven.
- Bake for 50 minutes, tenting the top with foil if the crust browns faster than the center cooks.
- Remove from the oven, brush with additional melted butter, and sprinkle with coarse sea salt.
- Cool in the pan for 10 minutes before removing to a wire rack for serving.
Chef Tips for Perfect Results
- Always use room temperature eggs and butter to ensure the dough emulsifies correctly and rises evenly.
- Do not rush the first rise; the yeast needs sufficient time to produce enough carbon dioxide for a fluffy crumb.
- Use fresh herbs whenever possible for a brighter, more aromatic profile compared to dried varieties.
- Tent the bread with aluminum foil halfway through baking to prevent the cheese and garlic from burning.
Common Mistakes to Avoid
- Over-flouring the dough: Adding too much flour results in a dense, tough bread instead of a soft loaf.
- Using water that is too hot: Liquid above 120F will kill the yeast, preventing the bread from rising entirely.
- Ignoring the windowpane test: If the gluten has not been properly developed, the bread will lack the structure to hold its shape.
- Baking too close to the top heating element: This leads to a burnt top before the interior is fully cooked through.
Variations and Substitutions
| Ingredient | Substitution | Flavor Impact |
| Mozzarella | White Cheddar | Adds a sharper, tangier profile |
| Rosemary | Thyme | Provides a more earthy, floral note |
| All-Purpose Flour | Bread Flour | Increases chewiness and structure |
Frequently Asked Questions
Can I make this dough ahead of time?
Yes, you can prepare the dough ahead of time by letting it rise in the refrigerator overnight. This cold fermentation actually improves the depth of flavor in the finished loaf.
How do I know when the bread is fully baked?
The bread is done when the internal temperature reaches 190F or the exterior is a deep golden brown. The loaf should also sound hollow when tapped on the bottom.
Why is my dough so sticky?
Dough is often sticky due to high humidity or insufficient kneading, but avoid adding too much flour at once. Continue kneading for the full five minutes before deciding if it truly requires more dry ingredients.
Can I freeze this pull apart bread?
You can freeze the baked loaf by wrapping it tightly in plastic wrap and heavy-duty foil. Reheat it directly from frozen in a 300F oven until soft and warmed through.
What should I serve this with?
This bread pairs beautifully with creamy tomato soup or a fresh garden salad. It also serves as a perfect side for pasta dishes like fettuccine alfredo.
Conclusion
Mastering this pull apart garlic bread provides a rewarding experience that transforms simple kitchen staples into a gourmet side dish. By following these steps and focusing on the quality of your dough, you will achieve the perfect balance of crispy edges and pillowy interiors. Enjoy this savory treat warm from the oven for the best results. Whether sharing with family or enjoying it as a solo comfort, the blend of garlic and herbs ensures a delicious experience every time.
Print
Pull Apart Garlic Bread
- Total Time: 150
- Yield: 12 pieces 1x
- Diet: Vegetarian
Description
Experience the comfort of warm, homemade bread with this delightful pull-apart garlic loaf. Featuring a soft, pillowy yeast dough infused with aromatic herbs, savory garlic-butter, and a generous layer of melted cheese, every bite offers a perfect balance of textures. This tear-and-share bread is a versatile centerpiece for any dinner table, providing a bakery-quality experience with simple pantry staples and a straightforward, stress-free baking process.
Ingredients
2 teaspoons Platinum yeast
1 tablespoon granulated sugar
3/4 cup whole milk (warmed to 110F)
8 tablespoons unsalted butter (divided)
2 1/3 cups all-purpose flour
1 large egg
1.5 teaspoons garlic powder (divided)
1 teaspoon salt
2 tablespoons fresh herbs (rosemary and parsley mix)
3/4 cup shredded mozzarella or parmesan cheese
Instructions
Combine yeast, sugar, and warm milk in a bowl and let sit for 10 minutes until frothy.
Add melted butter, egg, flour, salt, and half the garlic powder to the yeast mixture.
Beat on low speed until the dough pulls away from the sides, adding flour as needed.
Knead for 5 minutes until smooth and elastic, then place in a greased bowl and cover to rise for 60 minutes.
Roll out dough, brush with remaining butter, sprinkle with herbs, cheese, and remaining garlic powder.
Cut dough into small squares and stack them into a greased loaf pan.
Cover and let rise for another 30 minutes.
Bake at 375F (190C) for 50 minutes until golden brown.
Notes
Ensure the milk is not too hot to avoid killing the yeast. You can substitute fresh herbs with dried Italian seasoning if preferred. Store leftovers in an airtight container for up to two days and reheat in the oven for best texture.
- Prep Time: 20
- Cook Time: 50
- Category: Baking
- Method: Baking
- Cuisine: Italian-American
Nutrition
- Serving Size: 1 piece
- Calories: 210
- Sugar: 2g
- Sodium: 280mg
- Fat: 11g
- Saturated Fat: 6g
- Carbohydrates: 22g
- Fiber: 1g
- Protein: 6g
- Cholesterol: 45mg