
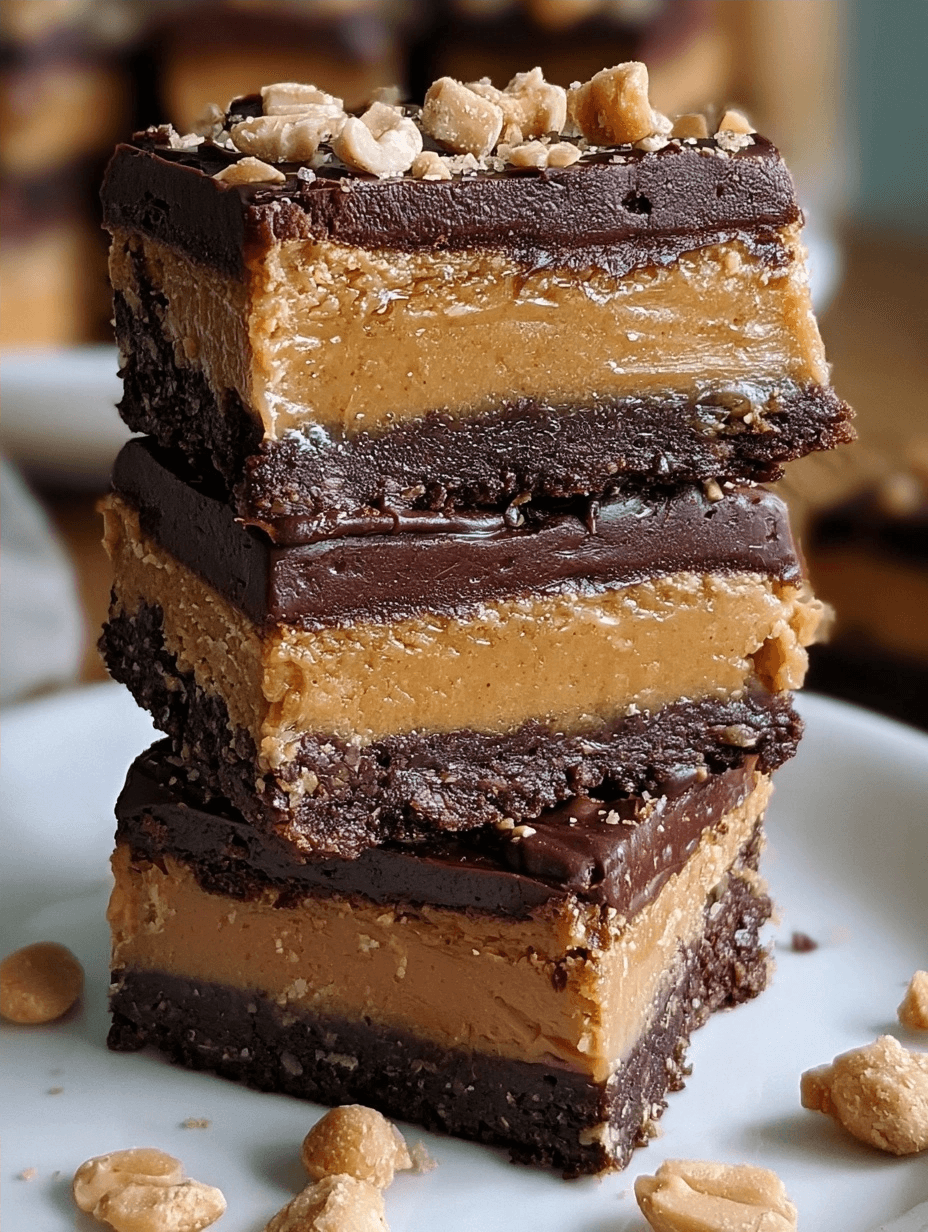
Dairy-Free Peanut Butter Fudge Bars are rich, decadent dessert squares featuring a brownie base topped with creamy nut butter and smooth chocolate ganache. At Eminent Recipes, I prioritize flavor profiles that accommodate various dietary needs without sacrificing the indulgence of a classic treat. This recipe provides a structured, reliable method for creating professional-quality bars that satisfy every craving for a balance of salt and sweet in one simple, crowd-pleasing dessert package.
Recipe Overview
| Prep Time | Cook Time | Total Time | Servings | Difficulty | Cuisine |
|---|---|---|---|---|---|
| 20 mins | 25 mins | 2 hrs 15 mins | 32 bars | Easy | American |
Why This Recipe Works
This recipe works because it relies on the structural integrity of a high-quality boxed brownie mix while layering professional pastry techniques for the toppings. I have tested this method repeatedly to ensure the peanut butter layer sets firmly without becoming brittle, providing a satisfying bite that contrasts perfectly with the dense, chewy brownie base below.
You will love these bars because they are exceptionally quick to assemble for busy weeknights or large gatherings. The use of a microwave-safe method for both the fudge and ganache layers saves significant active time, making this a reliable one-pot style assembly process that produces gourmet results with minimal kitchen cleanup.
Ingredients
| Ingredient | Quantity | Notes |
|---|---|---|
| Brownie Mix | 18.75 oz pkg | Use a dairy-free certified mix |
| Peanut Butter Chips | 10 oz pkg | Ensure they are dairy-free brand |
| Sweetened Condensed Coconut Milk | 14 oz can | Use full-fat coconut alternative |
| Creamy Peanut Butter | 1/2 cup | Natural variety works best |
| Vanilla Extract | 1 tsp | Pure vanilla extract |
| Sea Salt | 1 pinch | Enhances sweetness |
| Semisweet Chocolate Chips | 1.5 cups | Check label for dairy-free |
| Full-fat Coconut Cream | 3/4 cup | Solid part of canned coconut milk |
| Roasted Salted Peanuts | 1/2 cup | Chopped for topping |
Step-by-Step Instructions
Preparing the Brownie Base
- Preheat your oven to 350°F.
- Spray a 13- x 9-inch baking pan thoroughly with baking spray with flour to prevent sticking.
- Prepare the brownie mix according to the package directions.
- Pour the batter into your prepared baking pan.
- Bake for approximately 25 minutes or until a wooden pick inserted in the center comes out clean.
- Cool the brownies completely on a wire rack for one hour before proceeding.
Creating the Fudge Layer
- Place peanut butter chips, sweetened condensed coconut milk, peanut butter, vanilla, and salt in a bowl.
- Microwave the mixture on HIGH for 1 minute.
- Stir the mixture vigorously until it reaches a smooth consistency.
- Spoon the mixture over the cooled brownies and spread it into an even layer.
Adding the Ganache and Topping
- Place chocolate chips and coconut cream into a small bowl.
- Microwave on HIGH for 2 minutes, stirring every 30 seconds until fully melted.
- Pour the ganache over the peanut butter layer and spread evenly.
- Refrigerate for 1 hour until the top layer is firm.
- Sprinkle the chopped peanuts over the top before slicing into 32 bars.
Chef Tips for Perfect Results
- Always use room temperature ingredients for the fudge layer to ensure the emulsification process happens smoothly.
- Measure your coconut cream by scooping the solidified portion from the top of a chilled can for the richest ganache texture.
- Use a plastic knife to slice the bars after refrigeration to prevent the chocolate layer from cracking during service.
- Line the pan with parchment paper in addition to spraying if you plan on lifting the bars out for easier cutting.
- Keep the chopped peanuts in an airtight container until the final step to maintain their crunch against the creamy topping.
Common Mistakes to Avoid
One major error is rushing the cooling process of the brownies, which causes the fudge layer to melt and lose its shape. Always wait for the brownies to reach room temperature before applying the toppings. Another mistake is overheating the chocolate ganache, which can cause the fats to separate; stir frequently and use short intervals to avoid this. Avoid using reduced-fat milk alternatives, as they lack the necessary fat content to set the fudge correctly. If your fudge layer remains runny, the mixture likely contained too much moisture from an improper substitute; ensure you use thick, shelf-stable plant-based milks.
Variations and Substitutions
| Ingredient | Substitution | Impact on Flavor |
|---|---|---|
| Peanut Butter | Almond Butter | More delicate nutty profile |
| Peanut Butter Chips | Dairy-Free White Chips | Sweeter, creamier finish |
| Roasted Peanuts | Toasted Walnuts | Adds an earthy, sophisticated crunch |
Serving Suggestions and Pairings
These bars pair excellently with a hot cup of black coffee or a glass of chilled almond milk for an afternoon energy boost. They are a perfect addition to holiday platters, birthday celebrations, or any event requiring a crowd-pleasing, allergy-conscious sweet treat. Serve them chilled directly from the refrigerator for the best structural integrity and mouthfeel.
Storage and Reheating
| Method | Duration | Instructions |
|---|---|---|
| Refrigerator | 5-7 days | Keep in a sealed airtight container |
| Freezer | 3 months | Wrap individually and store in a freezer bag |
Nutritional Information
| Nutrient | Amount per Serving |
|---|---|
| Calories | 185 kcal |
| Protein | 3g |
| Fat | 11g |
| Carbohydrates | 22g |
| Fiber | 1g |
| Sugar | 16g |
| Sodium | 85mg |
Approximate values.
Frequently Asked Questions
Can I substitute the peanut butter chips with something else?
You can substitute the peanut butter chips with dairy-free chocolate chips to create a double-chocolate fudge bar variation. Ensure the chips are of high quality to maintain the smooth texture required for the middle layer.
How do I know when the brownies are perfectly done?
The brownies are done when a wooden pick inserted into the center comes out clean or with just a few moist crumbs. Overbaking leads to a dry base, so check the pan two minutes before the timer ends.
What is the best way to cut these bars cleanly?
Run a sharp knife under hot water and wipe it dry before each cut to ensure clean edges on your dairy-free peanut butter fudge bars. This prevents the chocolate ganache from dragging or cracking when you slice through the layers.
Can this recipe be made a day in advance?
This recipe is ideal for making a day ahead because the flavors meld together while sitting in the refrigerator overnight. Keep the bars covered tightly to ensure they stay fresh and do not absorb other odors from your fridge.
Why did my fudge layer not set properly?
The fudge layer fails to set when the ratio of liquid to fats is off, usually from using a thin milk alternative instead of the recommended heavy coconut cream. Double-check your ingredient labels to ensure you are using high-fat dairy-free components.
These Dairy-Free Peanut Butter Fudge Bars deliver a reliable, rich experience that proves dietary restrictions never need to compromise on quality. By following these precise steps and techniques, you will produce a professional-grade dessert that everyone can enjoy regardless of their dietary needs. Whether you are baking for a special occasion or simply treating yourself, these bars offer the perfect combination of textures and deep, savory-sweet flavor in every single bite.
Print
Dairy-Free Peanut Butter Fudge Bars
- Total Time: 135
- Yield: 32 bars 1x
- Diet: Dairy-Free
Description
Indulge in these rich, decadent dessert squares featuring a chewy brownie base topped with a creamy peanut butter layer and finished with a smooth chocolate ganache. Perfect for gatherings or weeknight treats, this recipe balances salty and sweet flavors while remaining completely dairy-free. Using high-quality dairy-free alternatives ensures you get professional-quality results with minimal effort, making these bars a crowd-pleasing addition to any dessert table.
Ingredients
18.75 oz pkg dairy-free certified brownie mix
10 oz pkg dairy-free peanut butter chips
14 oz can sweetened condensed coconut milk
1/2 cup creamy natural peanut butter
1 tsp pure vanilla extract
1 pinch sea salt
1.5 cups dairy-free semisweet chocolate chips
3/4 cup full-fat coconut cream (solid part)
1/2 cup roasted salted peanuts, chopped
Instructions
Preheat your oven to 350°F and grease a 13- x 9-inch baking pan.
Prepare the brownie mix according to the package directions and pour into the pan.
Bake for 25 minutes until a toothpick inserted in the center comes out clean.
Cool the brownies completely on a wire rack.
In a microwave-safe bowl, combine peanut butter chips, condensed coconut milk, creamy peanut butter, vanilla, and salt.
Microwave in 30-second intervals until smooth and pourable, then spread evenly over cooled brownies.
Place the pan in the refrigerator for 30 minutes to set.
Combine chocolate chips and coconut cream in a microwave-safe bowl and heat in 30-second intervals until melted and glossy.
Spread the ganache over the peanut butter layer.
Top with chopped peanuts and chill for at least 1 hour before slicing into 32 bars.
Notes
Ensure the coconut cream is scooped from the chilled top layer of a full-fat canned coconut milk for best results. Store bars in an airtight container in the refrigerator for up to one week.
- Prep Time: 20
- Cook Time: 25
- Category: Baking
- Method: Baking and Microwave Melting
- Cuisine: American
Nutrition
- Serving Size: 1 bar
- Calories: 210
- Sugar: 18g
- Sodium: 140mg
- Fat: 11g
- Saturated Fat: 6g
- Carbohydrates: 26g
- Fiber: 2g
- Protein: 3g
- Cholesterol: 0mg