
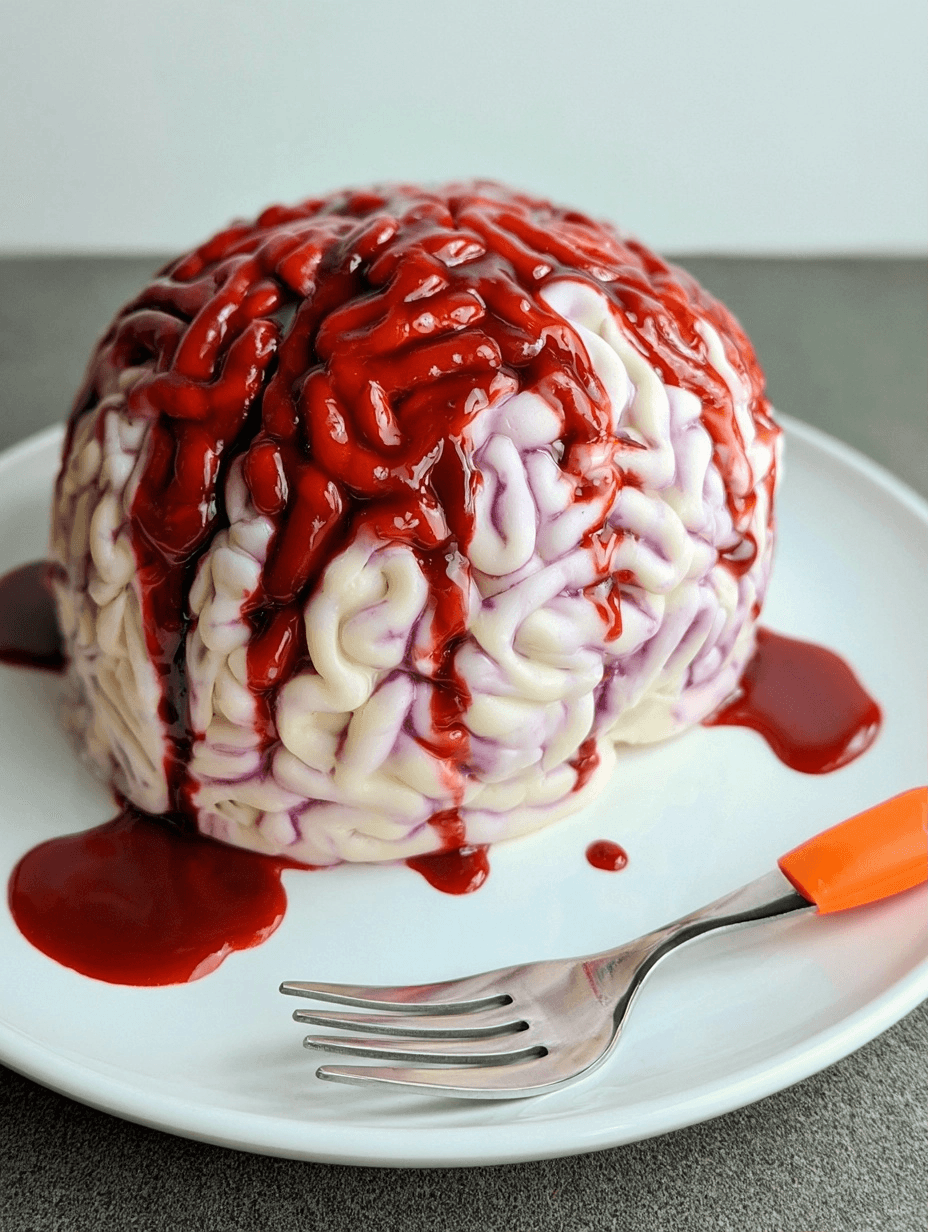
A Halloween cake brain is a gruesome yet delicious dessert perfect for any spooky celebration. This centerpiece features a red velvet sponge sculpted into a realistic anatomical organ, draped in modeling candy clay, and finished with a realistic jam-based blood glaze. At Eminent Recipes, I focus on creating desserts that balance theatrical presentation with genuine comfort food quality. This specific project proves that you do not need professional culinary school training to produce a high-impact, family-friendly Halloween showstopper that tastes as good as it looks.
I remember my first attempt at this recipe during a dark October night when the local party store failed me. I realized that the best holiday treats come from utilizing simple pantry staples like red velvet cake and easy-to-create candy clay. You will love this recipe because it is surprisingly quick to assemble, utilizes basic, budget-friendly ingredients, and offers immense room for artistic customization. Whether you are hosting a busy weeknight Halloween party or crafting a special treat for children, this one-pot method approach simplifies the chaos of holiday baking.
Why This Recipe Works
This recipe works because the natural texture of red velvet cake provides the perfect density for carving precise, organic shapes. By shaving down the sides, you create the rounded silhouette of a brain without needing specialized molds, ensuring the project remains accessible to every level of baker.
Furthermore, the candy clay component serves as an ingenious, edible structural element. It remains pliable enough to mold into realistic brain matter textures while hardening sufficiently to hold its shape for several hours. This combination of moist sponge and slightly chewy candy coating provides a professional-level contrast in mouthfeel that satisfies guests of all ages.
Recipe Overview
| Prep Time | 30 minutes |
|---|---|
| Cook Time | 35 minutes |
| Total Time | 1 hour 5 minutes + cooling |
| Servings | 8 servings |
| Difficulty | Medium |
| Cuisine | American/Halloween |
Ingredients
| Ingredient | Quantity | Notes & Alternatives |
|---|---|---|
| Red Velvet Cake Mix | 1 box | Use your preferred brand. |
| Vanilla Frosting | 1 cup | Store-bought or homemade. |
| White Candy Melts | 12 oz | Do not use white chocolate chips. |
| Corn Syrup | 1/4 cup | Necessary for candy clay elasticity. |
| Cornstarch | As needed | Prevents sticking during molding. |
| Honey | 2 tbsp | Base for the edible blood glaze. |
| Strawberry Jam | 2 tbsp | Avoid jelly for texture. |
| Burgundy Gel Color | 2 tbsp | Use gel, not liquid, for color depth. |
Step-by-Step Instructions
Part 1: The Cake Base
- Preheat oven to 350 degrees F and grease a 6-cup glass mixing bowl with nonstick cooking spray.
- Prepare cake mix in a large bowl according to package directions, whisking until smooth.
- Pour batter into the prepared bowl and bake for 30-35 minutes until a toothpick inserted in the center comes out clean.
- Remove the cake from the oven and allow it to cool completely before attempting to remove it from the bowl.
Part 2: The Candy Clay
- Melt the white candy melts in the microwave in 30-second increments or according to package directions.
- Stir in the corn syrup immediately until the mixture thickens into a firm, clay-like consistency.
- Wrap the warm candy clay tightly in plastic wrap and allow it to cool and firm up in the refrigerator for at least one hour.
Part 3: Assembly and Decoration
- Remove the cooled cake from the bowl and use a bread knife to level off the flat bottom if necessary.
- Carve subtle, rounded shapes into the top of the cake, using images of brains as a loose guide for where to place the bumps.
- Apply a thin, even layer of vanilla frosting over the entire surface to act as glue for the candy strips.
- Knead small portions of candy clay on a cornstarch-dusted board until soft and pliable.
- Roll the clay into long, 1-inch thick snakes and drape them over the frosting in winding, irregular patterns to mimic brain lobes.
- Mix the honey, strawberry jam, and burgundy gel color in a small bowl until it reaches a realistic, dark blood consistency.
- Brush the jam mixture carefully into the crevices of the candy clay, ensuring it pools in the gaps for an authentic effect.
Chef Tips for Perfect Results
- Always use gel food coloring instead of liquid; liquid alters the moisture balance of the icing and creates streaks rather than a deep, rich hue.
- Work your candy clay in small batches as it will firm up quickly; keep the remaining clay wrapped tightly so it does not dry out.
- Use a serrated bread knife for carving the cake to get cleaner edges and minimize rogue crumbs that might ruin the smooth frosting finish.
- Place a generous dollop of frosting on your serving platter before setting the cake down to prevent it from sliding during the decoration process.
Common Mistakes to Avoid
- Melted candy clay is often too hot; allow it to cool completely before working with it, or it will be too sticky to form snakes.
- Using excess frosting results in a lumpy brain; apply only a thin crumb coat to provide a stable base for the candy lobes.
- Forgetting to dust your workspace with cornstarch makes the clay stick to the counter, leading to frustration and torn designs.
- Adding too much jam results in a runny mess; ensure your blood mixture is thick enough to sit inside the crevices rather than dripping off the cake.
Variations and Substitutions
| Ingredient | Substitution | Impact on Flavor |
|---|---|---|
| Red Velvet Mix | Chocolate Cake Mix | Richer, darker aesthetic. |
| Strawberry Jam | Raspberry Jam | Tartness increases and seeds add texture. |
| Honey | Glucose Syrup | Allows for a slightly thicker, glossier finish. |
Frequently Asked Questions
How can I make this cake ahead of time?
You can bake the cake and prepare the candy clay up to two days in advance. Keep the components individually wrapped at room temperature until the day you plan to assemble your Halloween treat.
What if the candy clay is too hard to knead?
Warm the candy clay in your hands for several minutes or microwave it for five seconds to soften the fats. Kneading continuously will make it pliable enough to roll into your brain lobe shapes.
Can I use white chocolate instead of candy melts?
Candy melts are specifically formulated to set reliably, whereas white chocolate is temperamental and may not hold the clay structure as easily. For the best consistency, stick to high-quality candy melts.
How do I know the cake is fully cooked?
Test for doneness by inserting a wooden toothpick into the deepest part of the dome. If the toothpick comes out clean or with only a few moist crumbs, the cake is safe to remove from the oven.
What is the best way to serve this dessert?
Display your brain cake on a flat platter with some extra jam drizzled around the edges for effect. Use a warm, sharp knife to slice through the candy coating, which makes cutting easier and cleaner.
Halloween Brain Cake
This spooky, delicious cake is perfect for Halloween parties.
- Prep time: 30 minutes
- Cook time: 35 minutes
- Total time: 1 hour 5 minutes
- Difficulty: Medium
Creating this Halloween cake brain is a rewarding process that bridges the gap between home baking and creative artistry. While the appearance is intentionally chilling, the flavor profile remains a delicious, classic red velvet experience that guests will genuinely enjoy eating. Take your time with the sculpting process, focus on the details of the candy clay lobes, and do not be afraid to add extra blood for a realistic finish. Embrace the spirit of the season, have fun with the assembly, and enjoy every bite of your eerie, homemade masterpiece.
Print
Halloween Cake Brain
- Total Time: 65
- Yield: 8 servings 1x
- Diet: Vegetarian
Description
Transform a classic red velvet sponge into a startlingly realistic anatomical brain! This spooky centerpiece uses a simple sculpting technique and edible candy clay to achieve a gruesome, professional look without the need for expensive molds. Perfectly balanced with a sweet strawberry glaze ‘blood,’ this dessert is a fun, theatrical showstopper that tastes as incredible as it looks. Ideal for Halloween parties, it is simple enough for home bakers yet impressive enough to delight guests of all ages.
Ingredients
1 box red velvet cake mix
1 cup vanilla frosting
12 oz white candy melts
1/4 cup corn syrup
Cornstarch for dusting
2 tbsp honey
2 tbsp strawberry jam
Instructions
Prepare the red velvet cake according to package instructions and let it cool completely.
Crumble the cake into a bowl and mix with the vanilla frosting until a moldable consistency is achieved.
Shape the cake mixture into a long, rounded brain shape on a serving platter.
In a microwave-safe bowl, melt the white candy melts and stir in the corn syrup until a pliable candy clay forms.
Knead the candy clay on a surface dusted with cornstarch.
Roll the clay into thin ropes and drape them over the cake in a brain-like, winding pattern.
Whisk the honey and strawberry jam together to create the blood glaze.
Generously brush or drizzle the jam glaze over the candy clay to create a gory, realistic effect.
Notes
Ensure the cake is completely cooled before frosting to prevent it from sliding. If the candy clay becomes too firm, microwave for 5-10 seconds to soften. Store the cake in a cool place to keep the candy clay structure firm.
- Prep Time: 30
- Cook Time: 35
- Category: Baking
- Method: Baking and Sculpting
- Cuisine: American
Nutrition
- Serving Size: 1 slice
- Calories: 385
- Sugar: 42g
- Sodium: 280mg
- Fat: 14g
- Saturated Fat: 6g
- Carbohydrates: 62g
- Fiber: 1g
- Protein: 3g
- Cholesterol: 45mg