
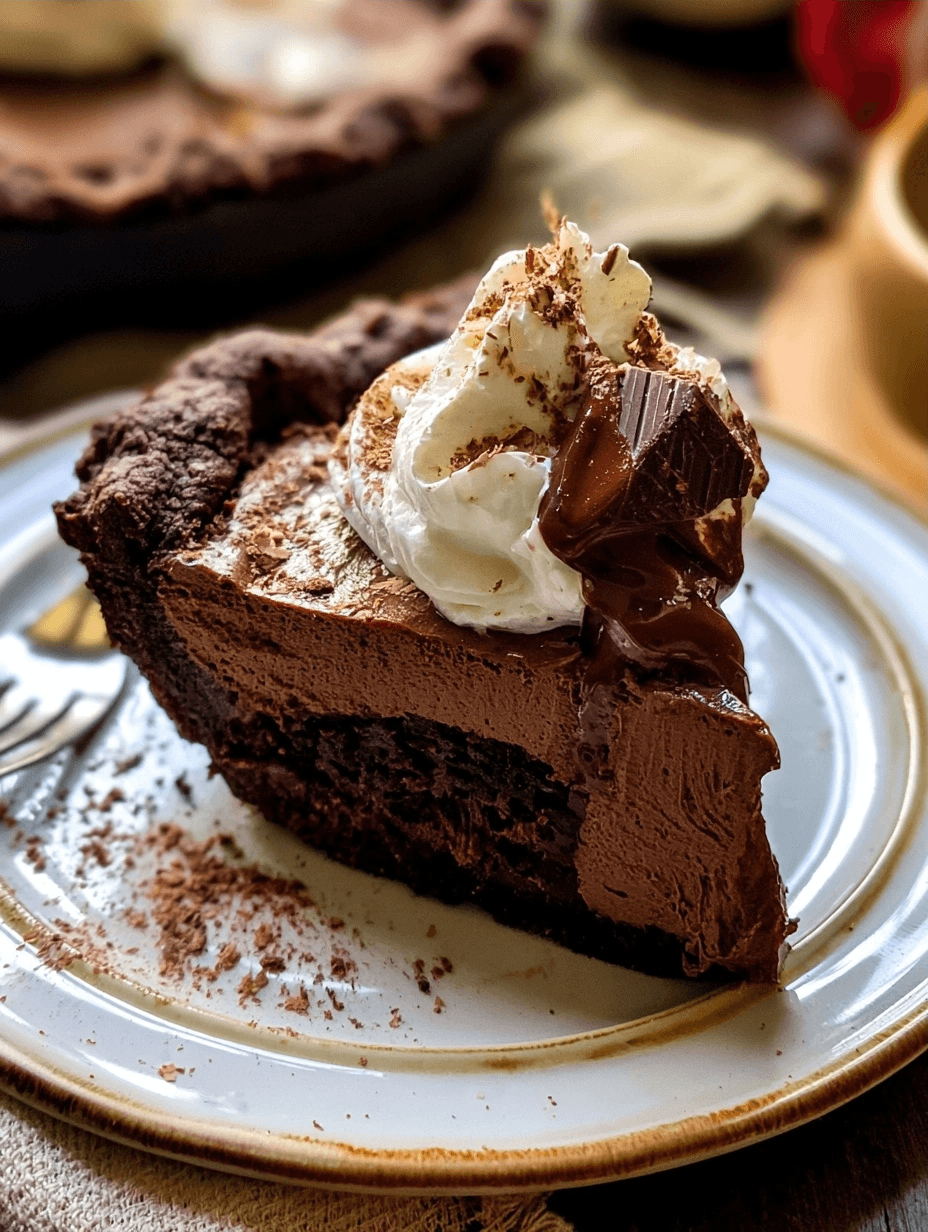
Magical Chocolate Pie provides a rich, velvety texture and deep cocoa flavor that satisfies any sweet craving. This recipe delivers a professional bakery-quality dessert in your own kitchen using simple pantry staples. Achieving the perfect balance between a crisp, buttery crust and a decadent, smooth filling ensures this dish becomes a recurring favorite for your family gatherings or quiet evenings at home.
Recipe Overview
| Prep Time | 30 mins (plus chilling) |
|---|---|
| Cook Time | 75 mins |
| Total Time | 1 hour 45 mins |
| Servings | 8 |
| Difficulty | Intermediate |
| Cuisine | American |
Why This Recipe Works
This recipe works because it relies on the science of tempered eggs and high-quality cocoa to create a structure that sets firmly without becoming rubbery. I developed this approach at Eminent Recipes to help home bakers avoid the common pitfalls of watery or grainy pie fillings. By carefully controlling the temperatures during the melting process, you ensure a glossy, uniform finish every time.
You will love this dish for its versatility and reliability on busy weeknights or special occasions. It remains one of my most requested recipes because it balances a sophisticated flavor profile with accessible techniques. Whether you are a beginner or a seasoned baker, this method provides a satisfying result that tastes even better the next day.
Ingredients
| Ingredient | Quantity | Notes |
| Pie Crust | 1 disk | Use a standard buttery, flaky recipe |
| Egg White | 1 large | Lightly beaten for wash |
| Unsalted Butter | 1/4 cup | Cut into small pieces |
| Semi-sweet Chocolate | 2 ounces | Finely chopped |
| Granulated Sugar | 1 cup | Standard white sugar |
| Cocoa Powder | 3 Tbsp | Natural or Dutch-process |
| Espresso Powder | 1 tsp | Enhances chocolate depth |
| Salt | 1/4 tsp | Fine sea salt |
| Heavy Cream | 1/4 cup | Must be room temperature |
| Vanilla Extract | 1 tsp | Pure extract preferred |
| Eggs | 2 large + 1 yolk | Room temperature |
Step-by-Step Instructions
Preparing the Crust
- Roll the chilled dough on a floured surface into a 12-inch circle.
- Place the dough into a 9-inch pie dish, folding the excess to form a thick rim.
- Crimp the edges decoratively and brush the rim with the beaten egg white.
- Line the crust with parchment paper and fill with pie weights.
- Chill the prepared crust in the freezer for 30 minutes to prevent shrinkage.
Baking the Pie
- Preheat your oven to 375°F.
- Bake the weighted crust for 15 minutes, then remove the weights and paper.
- Prick the bottom with a fork and bake for another 8 minutes to set the base.
- Reduce the oven temperature to 325°F.
- Melt the butter and chocolate together in the microwave in 20-second bursts.
- Whisk the sugar, cocoa, espresso powder, salt, cream, vanilla, eggs, and yolk until smooth.
- Stir the melted chocolate and butter into the egg mixture until combined.
- Pour the filling into the crust and bake for 50-55 minutes until the center stops wobbling.
- Cool the pie completely on a wire rack for at least 2 hours before slicing.
Chef Tips for Perfect Results
- Always use room temperature eggs to prevent the chocolate from seizing when mixed.
- Use an espresso powder to amplify the cocoa notes without making the pie taste like coffee.
- Invest in a pie crust shield to prevent the edges from burning during the long baking time.
- Ensure the pie cools completely; it sets significantly as the fats solidify at room temperature.
Common Mistakes to Avoid
- Overmixing the filling introduces air bubbles, which can cause the pie to crack. Whisk gently until just combined.
- Using cold ingredients can result in a grainy texture. Ensure your cream and eggs are at room temperature.
- Trimming the crust too short causes it to slump. Always fold the dough back over itself for a sturdy edge.
- Skipping the chilling step leads to shrinking. Always freeze the shaped crust for 30 minutes before baking.
Frequently Asked Questions
Can I substitute the semi-sweet chocolate?
You can substitute semi-sweet chocolate with bittersweet chocolate if you prefer a less sugary, more intense flavor profile. Avoid using milk chocolate, as the higher sugar and fat content may prevent the filling from setting correctly.
How do I know when the pie is done?
The pie is done when the center no longer jiggles upon lightly tapping the dish. It may appear slightly sticky on the surface, which is normal and will firm up as it cools.
Can I make the crust ahead of time?
You can prepare and blind-bake the crust up to 3 days in advance. Store it in the refrigerator tightly covered once it has cooled to maintain its crispness.
Why did my pie crack?
Cracking usually occurs if the oven temperature is too high or if the pie is baked for too long. Monitor the center closely during the final ten minutes of baking.
How should I store leftovers?
Leftover pie keeps best when stored in an airtight container at room temperature for up to 2 days. For longer storage, keep it in the refrigerator for up to 5 days.
Conclusion
Magical Chocolate Pie is the definitive solution for those seeking a rich, reliable dessert that never fails to impress. By following these professional techniques, you ensure a perfect, flaky crust and a silky filling every time. Embrace the simplicity of this classic treat and enjoy the deep, cocoa-forward profile in every slice. Happy baking!
Print
Magical Chocolate Pie
- Total Time: 105
- Yield: 8 servings 1x
- Diet: Vegetarian
Description
Indulge in a rich, velvety chocolate pie that delivers professional bakery-quality results right from your home kitchen. This decadent dessert features a crisp, buttery crust paired with a deep, smooth cocoa filling. Perfect for family gatherings or a luxurious treat at home, this recipe uses simple pantry staples to create a sophisticated flavor profile that remains a crowd-favorite. The secret lies in the careful tempering of eggs and high-quality chocolate for a glossy, firm finish that avoids common baking pitfalls.
Ingredients
1 disk pie crust (standard buttery recipe)
1 large egg white (lightly beaten for wash)
1/4 cup unsalted butter (cut into small pieces)
2 ounces semi-sweet chocolate (finely chopped)
1 cup granulated sugar
3 Tbsp cocoa powder
1 tsp espresso powder
1/4 tsp fine sea salt
1/4 cup heavy cream (room temperature)
1 tsp pure vanilla extract
2 large eggs + 1 yolk (room temperature)
Instructions
Roll the chilled dough on a floured surface into a 12-inch circle.
Place the dough into a 9-inch pie dish and fold the excess to form a thick, decorative rim.
Brush the rim with the beaten egg white.
Line the crust with parchment paper and fill with pie weights, then chill in the freezer.
Preheat oven to 375°F (190°C) and bake the crust for 15 minutes, then remove weights and bake 5 minutes more.
In a saucepan, melt butter and chopped chocolate over low heat until smooth.
Whisk in the sugar, cocoa powder, espresso powder, and salt until combined.
Gradually stir in the heavy cream and vanilla extract.
Whisk the eggs and extra yolk separately, then slowly temper them into the chocolate mixture.
Pour the filling into the pre-baked crust and bake at 325°F (165°C) for 45-55 minutes until the center is set but slightly wobbly.
Cool completely on a wire rack before slicing.
Notes
Ensure the eggs and heavy cream are at room temperature before mixing to prevent the chocolate from seizing.
Use high-quality cocoa powder for the best flavor depth.
Let the pie cool for at least 4 hours, or overnight, for the perfect slice structure.
Store leftovers in the refrigerator for up to 3 days.
- Prep Time: 30
- Cook Time: 75
- Category: Baking
- Method: Baking
- Cuisine: American
Nutrition
- Serving Size: 1 slice
- Calories: 320
- Sugar: 22g
- Sodium: 180mg
- Fat: 18g
- Saturated Fat: 10g
- Carbohydrates: 38g
- Fiber: 2g
- Protein: 5g
- Cholesterol: 85mg